Tip #40: Portable SSL Enabled Web Server for Windows
Today's tip is on setting up a personal SSL enabled web server for Windows. The application and its configuration files can easily fit on a USB flash drive for portable use. This method is not intended to be used as a large-scale web server, but rather as a simple way to transfer files to a limited group of people.
The application we'll be using is called SHTTPD (Simple HTTPD). SHTTPD provides the ability to use SSL connections, run Perl, PHP, or Python scripts, as well use basic authentication. We'll go over configuring the server for authentication, as well as creating our own self-signed SSL certificate for our SSL connection.
SHTTPD can be downloaded from here.
After you have downloaded the Win32 version of SHTTPD, unzip its contents to a directory on your PC, or to a USB flash drive.
To create our SSL certificate, we'll be using a Windows port of OpenSSL, which can be downloaded from here. Download and extract the OpenSSL files to a directory on your machine, and then download this sample configuration file and place it in the same directory as your OpenSSL files.
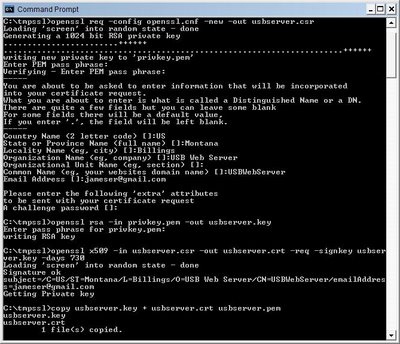
Open a Command Prompt (Start/Run/cmd), and change to the directory where you've extracted the OpenSSL files. Use the following commands to generate a self-signed SHTTPD compatible SSL certificate:
openssl req -config openssl.cnf -new -out usbserver.csr
openssl rsa -in privkey.pem -out usbserver.key
openssl x509 -in usbserver.csr -out usbserver.crt -req -signkey usbserver.key -days 730
copy usbserver.key + usbserver.crt usbserver.pem
These four commands will create the file usbserver.pem, which you can now copy into your SHTTPD directory.

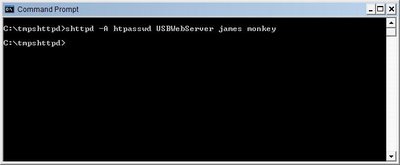
Now that we have our SSL certificate created, we can move on to creating a password file for authentication. In your Command Prompt, change directories to where you have SHTTPD installed. Use the following command to create a file called htpasswd which will contain the user ID and password you supply:
shttpd -A htpasswd YourServerName userid password
Replace YourServerName with a name you'd like to call your server, and also replace userid and password with your selections.

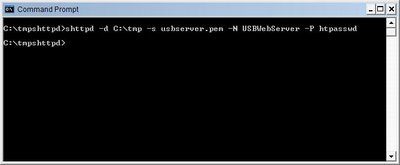
Finally, we are ready to start up our web server. To launch the server using our SSL certificate and password file, use the following command:
shttpd -d C:\tmp -s usbserver.pem -N YourServerName -P htpasswd
Replace directories and filenames as necessary to match your needs. The -d switch sets the root directory for your server.

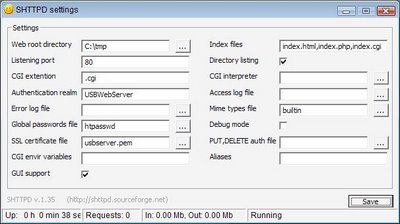
The settings you specified on the command line will be saved to shttpd.conf, so the next time you can start the server by simply launching shttpd.
The SHTTPD server runs in the system tray. To bring it to the foreground, right-click on the smiley-faced icon and select Settings. To exit, select Exit SHTTPD.

Your server can now be accessed by going to https://localhost, or https://your.ip.addr.ess If your machine is behind a router, you'll need to set up port forwarding on your router to point to the IP address of your PC and port 443.
If you have any questions, please leave a comment.
The application we'll be using is called SHTTPD (Simple HTTPD). SHTTPD provides the ability to use SSL connections, run Perl, PHP, or Python scripts, as well use basic authentication. We'll go over configuring the server for authentication, as well as creating our own self-signed SSL certificate for our SSL connection.
SHTTPD can be downloaded from here.
After you have downloaded the Win32 version of SHTTPD, unzip its contents to a directory on your PC, or to a USB flash drive.
To create our SSL certificate, we'll be using a Windows port of OpenSSL, which can be downloaded from here. Download and extract the OpenSSL files to a directory on your machine, and then download this sample configuration file and place it in the same directory as your OpenSSL files.
Open a Command Prompt (Start/Run/cmd), and change to the directory where you've extracted the OpenSSL files. Use the following commands to generate a self-signed SHTTPD compatible SSL certificate:
openssl req -config openssl.cnf -new -out usbserver.csr
openssl rsa -in privkey.pem -out usbserver.key
openssl x509 -in usbserver.csr -out usbserver.crt -req -signkey usbserver.key -days 730
copy usbserver.key + usbserver.crt usbserver.pem
These four commands will create the file usbserver.pem, which you can now copy into your SHTTPD directory.

Now that we have our SSL certificate created, we can move on to creating a password file for authentication. In your Command Prompt, change directories to where you have SHTTPD installed. Use the following command to create a file called htpasswd which will contain the user ID and password you supply:
shttpd -A htpasswd YourServerName userid password
Replace YourServerName with a name you'd like to call your server, and also replace userid and password with your selections.

Finally, we are ready to start up our web server. To launch the server using our SSL certificate and password file, use the following command:
shttpd -d C:\tmp -s usbserver.pem -N YourServerName -P htpasswd
Replace directories and filenames as necessary to match your needs. The -d switch sets the root directory for your server.

The settings you specified on the command line will be saved to shttpd.conf, so the next time you can start the server by simply launching shttpd.
The SHTTPD server runs in the system tray. To bring it to the foreground, right-click on the smiley-faced icon and select Settings. To exit, select Exit SHTTPD.

Your server can now be accessed by going to https://localhost, or https://your.ip.addr.ess If your machine is behind a router, you'll need to set up port forwarding on your router to point to the IP address of your PC and port 443.
If you have any questions, please leave a comment.


0 Comments:
Post a Comment
<< Home